Tuesday, December 18, 2012

My dilema over buying paint.

My students just recently finished creating textured clay fish. My whole thought process was that I was not going to use glaze but buy several different colors of metallic paints. I was just going to go to the craft store with my 50% off coupon and buy a set of six. Well....that is what I thought but that is not what happened. There was not a set I could buy and each bottle was $3.99. I didn't want to spend the money so I waited until the next day to go take a  look in my cabinets. This is what I found.....


Acrylic glitter glaze medium. No it is not metallic paint but it is different than just the regular tempera or adding modge podge to shine up the ceramic projects. Did I mention the kids loved the colors too (BONUS)! I just used a little tempera and more of the glaze and created my own glitter paint and a variety of colors.

Friday, December 14, 2012

NUTCRACKERS


I found an art lesson a few years back on artsonia and I switched it up a bit. This lesson is one of my favorites to do around the holidays. I have students use construction paper crayons, black sharpies, colored pencils, and gold paint.

 I have the black paper cut to 12x12 and the peach or tan cut to 6x9. I have the face tracers pre-made for the students to trace and cut out. I do step by step drawings of facial features and the uniform.


Sunday, November 25, 2012

FLAMINGO Collage


  I did this project at the start of the school year. I saw a picture on Pinterest and I wanted my students to do a similar version of the painting. Students could decide to draw their own contour of the bird or could trace using the tracers I made. I also had pictures I printed off. This was before I received my Smart Board. Now I do not print out handouts anymore. I just put the images on the Smart Board. So much easier plus I save paper and time.


 I had students use newsprint for the head and body and newspaper for the beak.


Now time to splatter!!! The students really enjoyed this part. I taped newspaper to the wall and placed newspaper on the floor. I had different shades/colors of pink for students to use. 

 Some students used large googly eyes. The googly eyes really looked cute. I am not a huge fan of googly eyes but sometimes they do make a project look better.

Wednesday, November 14, 2012

Pumpkins! Pumpkins!

I'm BACK!!! My goal this year was to post once a week and I have not made that goal. It has been a busy first quarter plus my hard drive failed and I lost everything on my computer:( However, I finally got my computer fixed and am back to blogging.

A few weeks into the start of school I was surprised with a smart board entering my room. I have been busy trying to learn the software and create lessons. I am super excited! I have to say at first I was not. I didn't want to have to learn another new technology and felt overwhelmed at the beginning of the year. I am happy to say now I enjoy using the smart board and my students LOVE it.

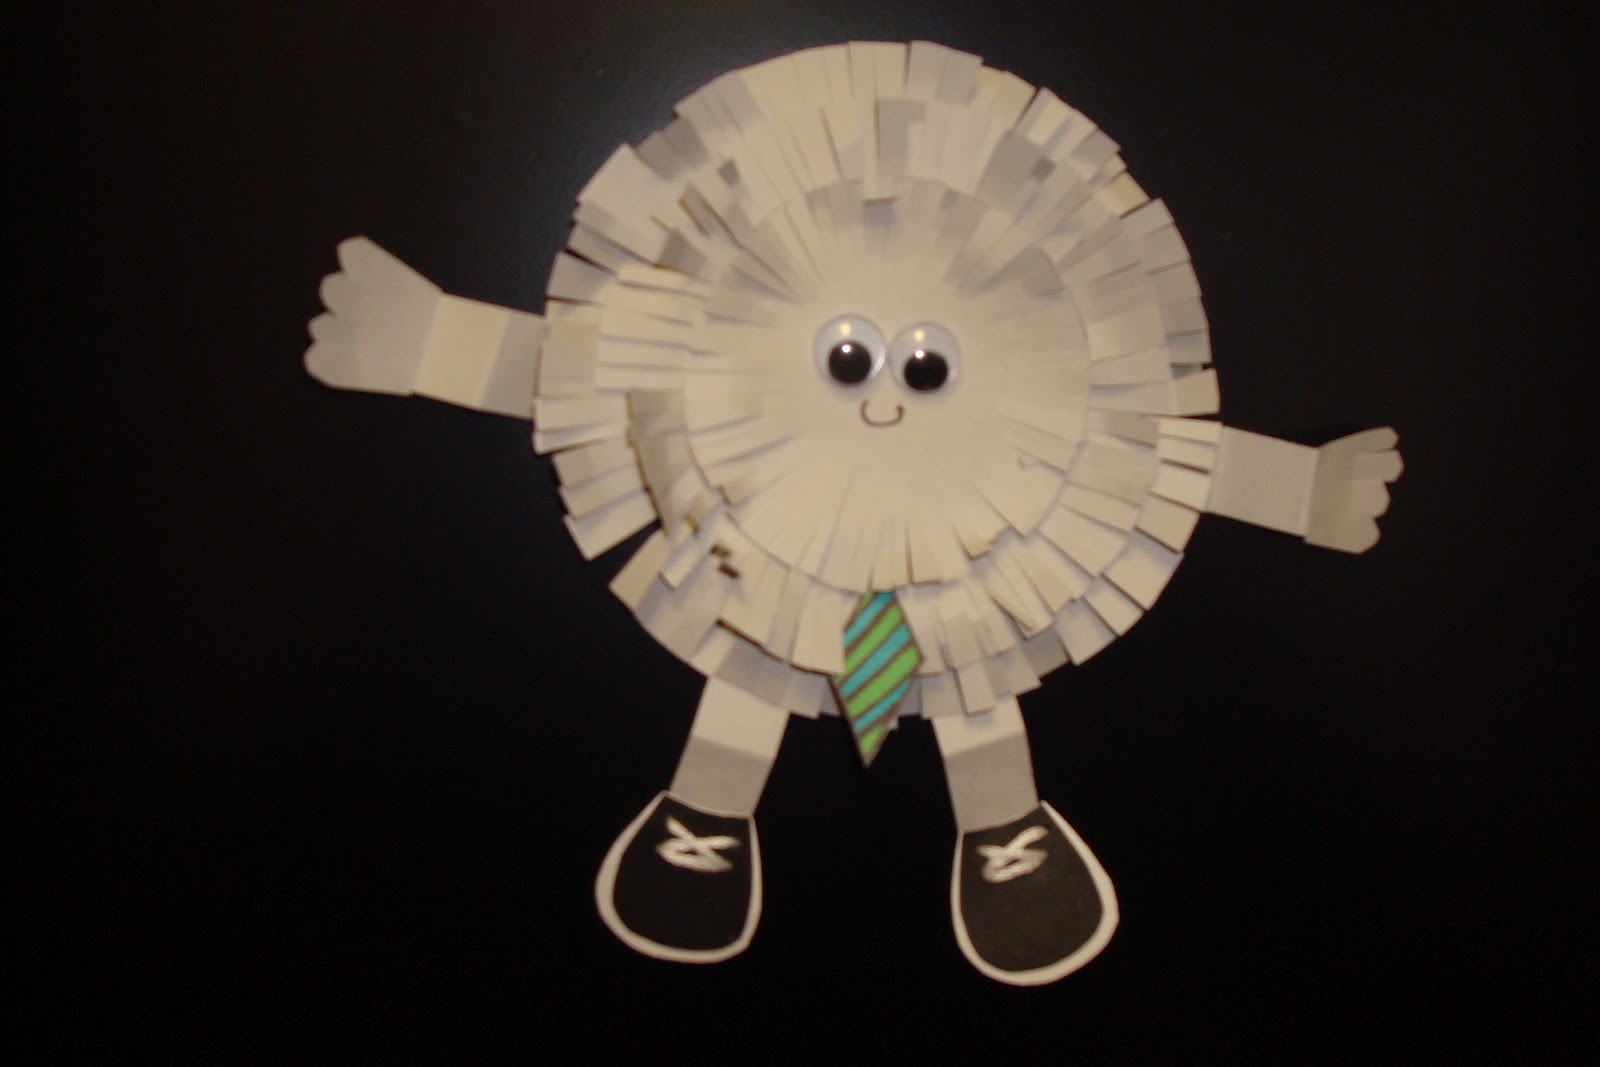
Every year at Thanksgiving my school has a Thanksgiving lunch on the last day before break. We all eat in the gym and I am responsible for the table decorations. This year the students are making pumpkins out of paper lunch bags and painted paper. I think they turned out beautiful.


Friday, September 28, 2012

Contour Plant Drawing

Contour Plant Drawing with DESIGNS and PATTERNS


This is one of my favorite assignments I do for High School art. First students need to draw the contour of the plant and pot. The pot then needs to be broken up into at least three sections in the front. After that students are to create pattern designs in every area. Designs switch when it enters a new section. An example is in the stem area. The stems are broken up by the leaves being in front. This creates sections in the stem. Each section is a differt design pattern. I also like to focus on contrast. Students need to think about thick and thin lines, straight or curvy lines, black and white, and other unique designs that create contrast. The background needs to be a continous pattern. I use sharpies for this assignment. 

Wednesday, September 19, 2012

BIRDHOUSE COLLAGE

COLLAGE #2


The students really enjoyed using all of the fun materials.
  • First I had students paint the background paper (9x24) using blue watercolors and the rubbing alcohol technique. This technique is used by applying rubbing alcohol to the wet paint using a dropper.
  •  Next the students worked on their birdhouses. I created birdhouse tracers that they could choose from. The birdhouses were traced onto scrapbook paper. The students enjoyed this. I seldom buy scrapbook paper to use in art projects. I just may start buying more.
  • The students designed their birdhouse on the backside of the scrapbook paper.
  • Then it was time for the FUN part. Students used buttons, scrap paper, mosaic pieces, wood pieces, and whatever else I could find in my room.
  • Then construction paper pieces. This included the grass, the wooded post, and the flowers.
  • Last but not least our cotton balls for clouds.
Have you ever used 3-d O's? This is how I had the students attach their birdhouses to the paper.

I did this project a few different ways this past week. On Fridays I travel to another building to teach two classes. I teach ART on the CART there. I do paint with the students (on Friday classes) but when I have the students paint we have  to head down to the cafeteria. For this project I did not  have them paint. I just used blue construction paper.


Monday, September 17, 2012

Flower and Vase Collage

COLLAGE


My elementary students are focusing on creating a collage out of a variety of materials. The background is a crayon resist using watercolors. The table cloth is from a sample book of curtains. If you know anyone that can get you these samples take them up on it. I have tons of these book samples. The border is made of scrapbooking paper. The vase is construction paper and construction paper crayons. The flowers are made out of construction paper and buttons.


Thursday, August 30, 2012

Birds with Patterns and Designs


Teacher Example

All summer long the only work I did for school was pin on Pinterest. I noticed that I was pinning a lot of bird ideas. You will be seeing a lot of birds this year. I started the students off by drawing the bird. I do a lot of step by step procedures. First the students drew an egg shape for the body of the bird. Then a beak and a tail. I then moved on to the wing and belly. The eye was last. I had the students draw a large eye. After that the students drew patterns and designs inside the bird. Next a black sharpie. Students went over their pencils lines in black. Then I have them erase the pencil lines. COLOR SCHEME!!!! Students could only pick 5 colors for their bird color. The colors were also incorporated in the background. I am so impressed with the background. I think it adds something special to the work.

I couldn't wait to post so right now I only have two student projects to show you. I think my students did a fabulous job!


Tuesday, August 28, 2012

My art room - in the beginning

This is what I walked into on my first day back to work. I do not come in throughout the summer. I live about 45 to 50 minutes away from work. I never head that far north in the summer. It took me the 2 full teacher work days to get my room in order. I still need to do a bit more to my room. Those things are minor though. It is more labeling and things like that. In the next few days I hope to post the after pictures. I moved a few things around from last year and am pretty excited about the flow of the room. I am also working on new lessons that I hope to post in the next few weeks.

Saturday, August 25, 2012

Simple Birds


This is the very first assignment my primary students will be working on. Students will use watercolors, tisse paper, and a black sharpie. I love using modge podge and did try to incorporate it to glue on the tissue paper feathers (red bird) but I think I will have to pass on the modge podge this time. The background is watercolors and rubbing alcohol. I let students decide if they would like to have a WARM bird or a COOL bird. What ever bird they pick then the background will be the opposite.

Wednesday, August 22, 2012

Back to School


I have seen the blog world of art teachers awaken this week. I love looking at all of the rooms and getting great ideas. I am hoping to post my room and my changes this weekend. My room is not fancy but I am pretty pleased with the changes I have made.


I love doing bulletin boards but at times it does become overwhelming. I was asked to do a bulletin board a few hours before open house. I think many art teachers save things if they have the room and space. I created these monkeys a few years ago to do a spring bulletin board and these guys were lifesavers last night. I just added the SWING INTO SCHOOL to go along with the school year.


My goal this year is to post at least once a week. I hope I can accomplish this task!!!!

Thursday, July 12, 2012

I have LEARNED something today!


I have been wanting to learn more about how to do a few things to my blog. When I first put my blog together I just wanted to hurry up so I could participate with other art teachers. Now that summer break is here I have been trying to figure out a few things ....and let me tell you it has been countless hours of reading, researching, and trying to decode all of this stuff. Well today I was successful.

Today I learned how to .....
add words to a photo or image (I know simple you say but I didn't have a clue),
make images smaller, and
center my header.
Adding words to an image or photo is super easy..I have recently found out. When you right click on your photo or image you will then click on Open With. From there you click on Paint. This is where I began to write on my image. I am super excited!!!!

Making images smaller was very simple once I found this website www.shrinkpictures.com. I know it could be considered cheating but I think it is something pretty special. It helped me shrink my background and my header. Plus it was FREE!

Now centering my header. I have been trying to add an image to my header for sometime now but I could never get it centered. It bothered that I could not center it so I always went back to plain....there is nothing wrong with plain when you want it. I just didn't want plain. So I started researching how to center headers. I googled and found this website. Now I will say you can not cut and paste the code because it will not work. You need to type the code yourself.
Now I feel as if I have accomplished something today!!!!!


Wednesday, June 27, 2012

Paper Cut-Outs


I enjoy doing this project. I talk about symmetry, proper cutting techniques, fringing, color choice, and design and pattern. I also introduce students to Polish cut-outs.

I already have the petals cut in squares. I find this to be a bit easier for the students to draw circles the same size. From there the students can cut out the circles and fringe to make petals.

Students are to draw a pattern or design on the pot. Sharpie markers are used for the pot designs.

Sunday, June 17, 2012

ERIC CARLE Project


I was asked by the principal to create artwork to cover the tables in the library. Students had taken off the top layer of the table and bare wood was showing. So I decided to do an Eric Carle theme. This is the first table that the students created. I will have the students decorate another table at the being of this coming school year. It turned out better than I expected.

I Love Eric Carle!


I had students paint paper and then we cut out the shapes and pasted the pieces onto the table. This was a very FUN project to work on.

Sunday, June 10, 2012

Ceramic OWLS!!!! again


If you have had a chance to go through my blog you know I have a thing for owls. This lesson I found on Artsonia. I do not have pics of the finished project. I wish I did. The first time I tried this with my students I had them wedge the clay together before pounding it back into a block. I wanted to have the students use the proper techniques. Well, it didn't work out the way I wanted it to. I think there was too many air pockets because all but 2 blew up in the kiln. So the second time around NO wedging.

I enjoyed this lesson because the students used many objects to add texture to the owls. The eyes we used bottle caps and a pencil. The feathers we used paper clips and the clay needle for extra added texture.


Saturday, June 9, 2012

WARM FUZZIES

I don't know if any of you have ever heard of a WARM FUZZY but I was introduced to warm fuzzies in elementary. The warm fuzzies then were a funny creature with a big belly on copier paper. In the belly you would right a thank-you or an acknowledgement to the person you were giving the warm fuzzy to. Well of course being an art teacher you have to move away from Xeroxing the warm fuzzies and you need to personalize them for that individual.
I always wanted to make a warm fuzzy for people at work but I always seemed to busy or something came up. Well one day the counselor was a huge help and I was very thankful and grateful that she was able to assist me. By the end of the day I had forgotten to shot her an email thanking her. So I said, I'll just do it first thing in the morning. Of course I forgot. Now it had been a couple of days and I could not tell her thank-you now. It would seem as if it wasn't that important. SO .......my warm fuzzy was the perfect solution!!!!!


Then I was asked to make the warm fuzzies for the staff of the month and for our aide appreciation. On the back of the warm fuzzy I have a white piece of construction paper.

I start off by writing......This Warm Fuzzy is for___________. Then I add why that individual gets the warm fuzzy. It is a great way to make someone feel warm & fuzzy!!


Thursday, May 24, 2012

Mother's Day Projects

I found this idea on Pinterest. I had to change a few things because I had to use whatever was on hand:) I traced the students hand and they added texture, shapes, and tile. The mothers loved this present!!!!! The center white hand turned out great. (They all did). The student missed the day we glazed so I just added clear glaze.   I think next time I will stick with the clear glaze and the students can just paint over the tiles without covering the color of the tiles up.


 Coil Pots


Tuesday, May 15, 2012

Painted Paper Owls

Painted Paper Owls

This project used many fun painting techniques. The students enjoyed painting  the paper. It did get a bit hectic. Students were at different steps in the project at times. In the end it turned out WONDERFUL!


I became inspired by seeing a drawing I pinned on Pinterest. It came from a neat website. I am very taken by owls this school year. A bit obsessed I must say.


The painted paper techniques included
the background - rubbing alcohol and watercolors
owls - marbling, markers with water sprayed on them to bleed, Epsom salt and watercolors, tissue paper and a spray bottle to bleed, and sponging.


The tree limb was crayon and watercolors for a crayon resist.


Saturday, May 12, 2012

Junior High Woven Pillows


The junior high classes had such a great time weaving. The students loved the fact that the pillows were actually usable. I have never done a weaving project like this before.


Students first started out with a cardboard and yarn. Students wrapped the yarn around the cardboard to create their loom. The rest was weaving...over under over under.